CBlueUI  
C++ 跨平台跨框架的数据可视化工具
载入中...
搜索中...
未找到
开发文档

§.主题切换

  • dark light

示例代码

// 加载主题文件
ThemeCurrent()->LoadFile(_Txt("../res/theme/dark.xml")); // 深色
// ThemeCurrent()->LoadFile(_Txt("../res/theme/light-default.xml")); // 浅色
// 应用主题到所有控件
ApplyCurrentTheme();

§. 常用控件类名-汇总

§. 常用控件

CControlUI-基类

  • 设置控件标识符 通过此标识符,查找控件
    void SetVarName(const BeString& str);
  • 事件 每一种控件必然表征一种变化或者数据。当数据和变化改变时触发此事件。比如输入框内容改变,按钮按下等。 减轻开发人员记忆负担。当然对于复杂事件。用户想截获鼠标移动,按下消息。也保留了接口。 在实践应用中积累不错的口碑。
    auto lamda_cancel = [this]() {
    return TRUE;
    };
    std::shared_ptr<IActionNotify> action = std::make_shared<FunctorAction<> >(lamda_cancel);
    btnCancel->BindAction(action); ///< 绑定事件
    btnCancel->ClearAction(); ///< 清空事件
    btnCancel->TriggerAction(); ///< 触发事件
  • 显示或隐藏
    void ShowControl(bool bShow, bool notify_layout = true); ///< 显示虚拟窗口
  • 禁用
    void EnableControl(bool bEnable, bool refresh = true); ///< TRUE:启用控件. FALSE:禁用控件
  • 字体 注意:控件不负责,字体的销毁释放。一般从字体管理器中获取
    void SetFont(GFont* font); ///< 设置字体
  • 刷新重绘
    void Refresh(BOOL bSynch = FALSE);
  • 刷新时机 多种组合可让控件更加丰富
    void SetBkShowTiming(ShowModel mode); ///< 背景绘制时机
    void SetBorderShowTiming(ShowModel mode); ///< 边框绘制时机
    // 例子
    SetBorderShowTiming(OnNever); //表示不绘制边框
    SetBkShowTiming(OnAlways); //表示一直绘制边框
    SetBkShowTiming(OnHighLight); //表示高亮时绘制背景,其它状态不绘制
  • 动画属性 可针对控件的各种属性,进行动画渲染(语法格式与svg animate一致)
    <Control Class="CIndicatorLightUI" name="btnshadow" control-flags="DisableTheme" back-colors="normal:0x00FFFF;high:0x00FFFF" Layout="50,50" layout-align="vcenter" text-align="center|vcenter" shadow="-10,-10,15,15,2,2,rgb(255,255,255,255);10,10,15,15,3,3,rgb(0,0,0,40)" round-radius="rx:50%;ry:50%" state-current="1">
    <animate
    attributeName="back-opacity"
    dur="1s"
    calcMode="spline"
    repeatCount="indefinite"
    values="0.5; 0.8; 1.0; 0.7; 0.5"
    keyTimes="0; 0.25; 0.5; 0.75; 1"
    keySplines=".17,.67,.83,.67; .17,.67,.83,.67; .17,.67,.83,.67; .17,.67,.83,.67" />
    </Control>
  • 移动 对于有布局属性的控件。此函数无效
    BOOL MoveControl(RECT rect, BOOL bRepaint = TRUE);
    ///< 移动控件位置。(x,y)代表父控件坐标空间值
    BOOL MoveControl(int x, int y, int w, int h, BOOL bRepaint = TRUE);
    ///< 将控件移动到所有兄弟控件中的第一个
    BOOL BringBottomMost();
    ///< 将控件移动到所有兄弟控件中的最后一个
    BOOL BringTopMost();
  • 文本提示
    ///< 设置提示文本
    void SetToolTipText(LPCTSTR lpszTip);
    void SetToolTipText(BeString strTip);
    ///< 设置弹出pop显示ui
    void SetPopTipUI(std::shared_ptr<CControlUI> popui, std::shared_ptr<PopControlInfo> popinfo);
  • 文本
    // 获得文本
    LPCTSTR Text() const;
    // 设置文本
    void SetControlText(BeString str, BOOL bRefresh = FALSE);
    // 以数值设置文本
    void SetControlTextByNumber(double value, int nPrecision, BOOL remoe_last_zero);
    // 获得文本内容数值。
    double GetControlTextNumber() const;
  • 文本阴影
    ///< 设置文本阴影
    void SetShadowText(int dx, int dy, int blur_x, int blur_y, GColor color);
  • 背景阴影
    /// 获得阴影容器对象
    GShadowContain& CControlUI::GetShadowContain();
    /// 向容器内添加阴影参数
    class UI_EXP GShadowContain
    {
    public:
    GShadowContain();
    ~GShadowContain();
    // 添加阴影
    int AddShadow(int dx, int dy, int blur_x, int blur_y, int spread_x, int spread_y, GColor color, bool inset = false, bool use_color = true);
    // 更新阴影
    void UpdateShadow(int pos, int dx, int dy, int blur_x, int blur_y, int spread_x, int spread_y, GColor color, bool inset = false, bool use_color = true);
    // 删除阴影
    void RemoveShadow(int pos);
    // 清空阴影
    void ClearShadow();
    // 克隆
    void CloneFrom(GShadowContain* other);
    // 绘制阴影
    void DrawShadow(ISurface* surface, const PathTransInfo& pathinfo, bool inset);
    // 是否包含inset模式的阴影
    BOOL IsShadowCount(bool inset) const;
    // 阴影数量
    int Count() const;
    // 获取阴影
    ShadowInfo* GetShadows(int len);
    // 设置可见性
    void ShowShadow(BOOL show);
    private:
    std::vector<ShadowInfo*> m_shadowbox_list; // Shadow特效
    };
  • 设置颜色外观
    /// 外观场景类别
    {
    ColorOfBackground, ///< 背景
    ColorOfForeground, ///< 前景
    ColorOfText, ///< 文本
    ColorOfBorder, ///< 边框
    };
    /// 设置颜色外观
    void SetControlColorsStyle(ColorSceneType type, COLORSTYLE colors);
  • 属性 通过字符更新属性。也可以通过函数直接调用。字符串更新属性的方式,有字符匹配操作。高频操作会消耗性能
    void ShellAttribute(const BeString& szName, const BeString& szText);
    // 以下都是更新控件文本。但是SetControlText性能更高
    ShellAttribute("text", "new str");
    SetControlText("new str");
  • 在当前控件之下查找控件
    // isRecursiveCall 表示是否递归子控件
    CControlUI* FindControlByName(LPCTSTR szName, BOOL isRecursiveCall = TRUE) const;
  • 获得所有匹配名称控件
    // isRecursiveCall 表示是否递归子控件
    int FindAllControlByName(LPCTSTR szName, std::vector<CControlUI*>& vec, BOOL isRecursiveCall = TRUE) const;
  • 获得所有子控件
    // isRecursiveCall 表示是否递归子控件
    int FindAllControl(std::vector<CControlUI*>& vec, BOOL isRecursiveCall = TRUE) const;

CLabelUI-普通标签控件

  • 例子
    <Control Class="CLabelUI" platform="window" Layout="adapt:5,fill" text=" --OS: Window" Font="3" control-flags="use-par-color-text" />

按钮

  • CButtonUI 普通按钮
    <Control Class="CButtonUI" TEXT="tr:自动化应用" Name="btnRunScriptTest" Layout="adapt:10,fill" text-align="center|vcenter" control-flags="use-par-color-text" />
  • CButtonSysUI 系统按钮 内部封装最小化、最大化、关闭、隐藏等事件
    <Control Class="CButtonSysUI" Name="closebtn" Layout="30,fill:25" sysType="close" control-flags="use-par-color-text"/>
  • CButtonImageUI 图标按钮
    <Control Class="CButtonImageUI" Name="imagebtn" Layout="30,30" icon="button:close"/>
  • CButtonGradientUI 渐变按钮
    <Control Class="CButtonGradientUI" TEXT="tr:图标水平布局" Name="btnStopNotify" back-gradient-normal="bru_btnblue_nor12" control-flags="DisableTheme,RoundRadiusParl" text-colors="normal:0xFFFFFF" round-radius="left-top:15,0;right-top:0,0;right-bottom:-15,0;left-bottom:0,0;" Layout="fill,50" Icon="button:add" text-align="center|vcenter"/>
  • CButtonMenuUI 右键菜单按钮
    <Control Class="CButtonMenuUI" TEXT="MenuButton" Name="btnOpendir" Layout="150,40" text-align="vcenter">
    <PopControl pos="0,1" point-offset="0,10" align="left,top">
    <Control Class="CContainMenuUI" Layout="300,adapt" padding="1,0,1,0" border-show="always" control-flags="PopupProperties">
    <Control Class="CButtonMenuUI" TEXT="频率修正" Name="btnOpendir0" Layout="fill,30" text-align="vcenter" />
    <Control Class="CButtonMenuUI" TEXT="去噪" Name="btnOpendir1" Layout="fill,30" text-align="vcenter" />
    <Control Class="CButtonMenuUI" TEXT="混合" Name="btnOpendir2" Layout="fill,30" text-align="vcenter" />
    <Control Class="CButtonMenuUI" TEXT="修音" Name="btnOpendir3" Layout="fill,30" text-align="vcenter" />
    <Control Class="CButtonMenuUI" TEXT="音效增强" Name="more4" Layout="fill,30" text-align="vcenter" />
    <Control Class="CButtonMenuUI" TEXT="差分修正" Name="btnOpendir5" Layout="fill,30" text-align="vcenter" />
    </Control>
    </PopControl>
    </Control>
  • CButtonPolygonUI 多边形不规则按钮
    <Control Class="CButtonPolygonUI" Layout="150,150" edge-count="5" TEXT="tr:五边形按钮" cmd1="showcontrol(btnStop,false);" back-gradient-normal="bru_btnblue_nor"/>

CButtonSVGUI、CLottieUI 矢量动画控件

CLabelMultiStyleUI-HTML标签控件

  • 例子
    <Control Class="CLabelMultiStyleUI" Name="title" Layout="adapt:30,fill" text-align="left|vcenter" back-show="never">
    <html>
    <p>
    <i>
    <font size="20" color="0x0000ff">tr:html标签第一行:白月光照前方是希望</font>
    </i>
    </p>
    <br/>
    <p>tr:html标签第二行:对流星我许下愿望</p>
    <br/>
    <p>
    <font size="16" color="0x124578">tr:html标签第三行:我们深情的对望</font>
    </p>
    </html>
    </Control>

CCheckBoxUI-复选框

  • 设置状态开 或者 关
    // noTrigger TRUE:忽略事件触发
    // bRefresh 是否刷新控件。主要用于避免重复绘制。
    void SetSelected(BOOL bSelect, BOOL noTrigger = FALSE, BOOL bRefresh = TRUE);

CDigitLcdUI-液晶数字

  • 例子开 或者 关
    <Control Class="CDigitLcdUI" text="1357924680" Layout="adapt:10,fill"/>

CComboListUI-普通下拉框

  • 例子
    <Control Class="CComboListUI" Name="switch_lang" Layout="200,fill" border-show="always" cursel="0" HasTripe="false" input-type="ReadOnly" >
    <element TEXT="tr:CN-中文简体" TextID =".././res/lang/zh.xmllang"/>
    <element TEXT="tr:CNT-中文繁体" TextID =".././res/lang/cht.xmllang"/>
    <element TEXT="tr:RU-俄语" TextID =".././res/lang/ru.xmllang"/>
    <element TEXT="tr:EN-英语" TextID =".././res/lang/en.xmllang"/>
    <element TEXT="tr:AR-阿拉伯" TextID =".././res/lang/ar.xmllang"/>
    <element TEXT="tr:FR-法语" TextID =".././res/lang/fr.xmllang"/>
    <element TEXT="tr:KO-朝鲜" TextID =".././res/lang/ko.xmllang"/>
    <element TEXT="tr:JP-日语" TextID =".././res/lang/ja.xmllang"/>
    </Control>

CComboDateUI-日期下拉框

  • 例子
    <Control Class="CComboDateUI" Name="datecombo" value="now" border-show="always" HasTripe="false" input-type="ReadOnly" Layout="300,fill"/>

CComboDateUI-日期范围下拉框

  • 例子
    <Control Class="CComboDateRangeUI" Name="datecombo" begin="20230201" end="now" tipstext="date tips" dropWidth="400" border-show="always" Layout="fill,20"/>

CComboColorPickerUI-颜色选择下拉框

  • 例子
    <Control Class="CComboColorPickerUI" Name="colorcombo" value="0x3AB6F8" border-show="always" Layout="fill,20" tipstext="default tips"/>

CColorPickerUI-颜色选择面板

  • 例子
    <Control Class='CColorPickerUI' Name='colorpicker' Layout='fill,fill'/>

CEditTextUI-输入框

  • 输入内容
    // 设置输入内容。注意:前面提到的SetControlText,并不能设置输入内容
    void SetEditText(LPCTSTR str, BOOL bRefresh = FALSE);
    // 设置将数值设定为输入内容。内部实现自动转换为文本
    void SetNumber(double value, BOOL noTrigger = FALSE);
  • 例子
    <Control Class="CEditTextUI" Name="editbase10" Layout="300,fill" border-show="always" empty-tips="[0-9] e.g 2030 2056" input-type="Scientific" />

CEditSpinBoxUI-步进数值输入框

  • 输入内容
    // 设置将数值设定为输入内容。内部实现自动转换为文本
    void SetNumber(double value, BOOL noTrigger = FALSE);
  • 例子
    <Control Class="CEditSpinBoxUI" Name="stepnum3" Layout="300,fill" editbtnside="BothSide" input-range="0,100" border-show="always" Precision="3" defaultValue="0"/>

CEditTextRichUI-富文本输入框

  • 常用成员函数
    // 末尾追加行文本
    void AppendEditText(LPCTSTR str, uint32_t len = -1, BOOL bRefresh = FALSE);
    // 获得指定行对象
    CEditLine* GetEditLine(int pos) const;
    // 在指定pos行号插入新行
    CEditLine* InsertLine(int pos, LPCTSTR text, int count = -1, BOOL bRefresh = TRUE);
    // 删除pos行
    void DeleteLine(int pos, int count, BOOL bRefresh = TRUE);
    // 清除所有行
    void Clear(BOOL bRefresh = TRUE);
  • 例子
    <Control Class="CEditRichUI" name="richedittest" Layout="fill,fill" control-flags="AutoScrollVerEnd12" input-type="Multiline" input-range="0,100000" border-show="true" text="sdfsdff" text-file=".././res/00_uidemo.xml"/>

CContainerUI基类-容器控件

  • 封装容器UI特有属性。派生关系如下图

CContainLayoutUI-布局容器控件

  • 和单纯的布局对象不同。容器拥有控件分组和交互能力。单纯的layout只有布局功能无UI属性
    <Control Class="CContainLayoutUI" Name="connect_page" Layout="300,400" back-show="always" border-show="always" border-colors="normal:#5582F9;light:#5582F9">
    <!-- 子控件在这里创建 -->
    </Control>

§. 图表(Plot)控件

  • CChartViewUI类 常用函数
    // 添加坐标系
    void AddCoordinate(std::shared_ptr<CChartCoordinate> coord);
    // 序列图表:一组具有相同属性的元素。如点,k线,均值图
    void AddSeries(std::shared_ptr<CChartSeries> series, BOOL isNoclip = FALSE);
  • CChartSeries基类 序列图表
  • CChartCoordinate基类 坐标系和坐标轴
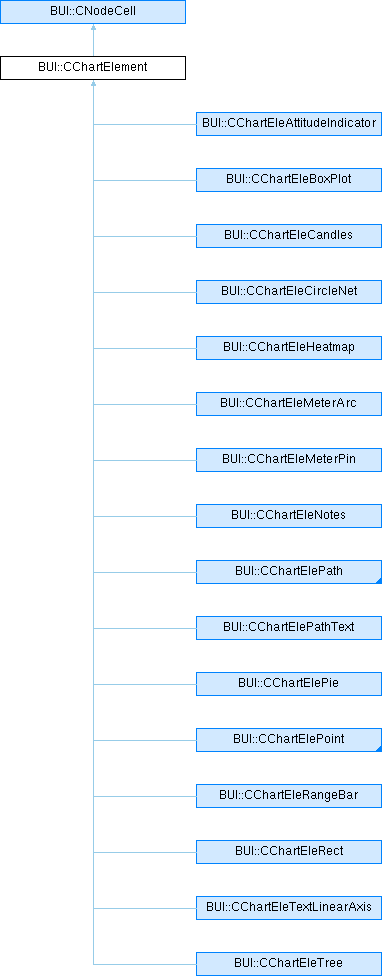
  • CChartElement基类 图元
  • 线图表例子
    <Control Class="CChartViewUI" name="chart0" Layout="300,fill" chart-padding="40,40,40,40" round-radius="rx:10;ry:10" back-show="always">
    <data>
    <!-->坐标轴X和Y。属性参考类文档<-->
    <CChartCoordinate class="LinearAxis" name="axis_x0" range="0,1" unit="0.1" minor-style="step:1" Precision="1" scope-increment="1"/>
    <CChartCoordinate class="LinearAxis" name="axis_y0" Vertical="true" Precision="1" range="-2,2" unit="0.1" minor-style="step:1" show-gridbk="false" zoom="false" />
    <!-->将坐标轴X和Y,组合成坐标系 。属性参考类文档<-->
    <CChartCoordinate class="CCoordinateAffine" name="axis_xy0" axisx="axis_x0" axisy="axis_y0"/>
    <!-->线条序列<-->
    <CChartSeries class="CChartSeriesLine" name="line" line-color="#FFA300" color="#FFA300" mark-type="cross" shadow="2,2,4,4,0,0,rgb(0,0,0,100)">
    <!-->序列内的元素。 Coord表示坐标系对象ID名称。v1表示第一个轴的值,v2表示第二坐标轴的值 <-->
    <CChartElement Class="CChartElePoint" Coord="axis_xy0" v1="0.0" v2="15"/>
    <CChartElement Class="CChartElePoint" Coord="axis_xy0" v1="0.3490658503988659" v2="19"/>
    <CChartElement Class="CChartElePoint" Coord="axis_xy0" v1="0.6981317007977318" v2="23"/>
    <CChartElement Class="CChartElePoint" Coord="axis_xy0" v1="1.0471975511965976" v2="27"/>
    <CChartElement Class="CChartElePoint" Coord="axis_xy0" v1="1.3962634015954636" v2="31"/>
    <CChartElement Class="CChartElePoint" Coord="axis_xy0" v1="1.7453292519943295" v2="35"/>
    <CChartElement Class="CChartElePoint" Coord="axis_xy0" v1="2.0943951023931953" v2="40"/>
    <CChartElement Class="CChartElePoint" Coord="axis_xy0" v1="2.443460952792061" v2="44"/>
    </CChartSeries>
    </data>
    </Control>
  • 柱状图例子
    <Control Class="CChartViewUI" name="chart0" Layout="300,fill" chart-padding="40,40,40,40" round-radius="rx:10;ry:10" back-show="always">
    <data>
    <!-->坐标轴X和Y。属性参考类文档<-->
    <CChartCoordinate class="LinearAxis" name="axis_x0" range="0,1" unit="0.1" minor-style="step:1" Precision="1" scope-increment="1"/>
    <CChartCoordinate class="LinearAxis" name="axis_y0" Vertical="true" Precision="1" range="-2,2" unit="0.1" minor-style="step:1" show-gridbk="false" zoom="false" />
    <!-->将坐标轴X和Y,组合成坐标系 。属性参考类文档<-->
    <CChartCoordinate class="CCoordinateAffine" name="axis_xy0" axisx="axis_x0" axisy="axis_y0"/>
    <!-->线条序列<-->
    <CChartSeries class="CChartSeriesLine" name="line" line-color="#FFA300" color="#FFA300" mark-type="cross" shadow="2,2,4,4,0,0,rgb(0,0,0,100)">
    <!-->序列内的元素。 Coord表示坐标系对象ID名称。v1表示第一个轴的值,v2表示第二坐标轴的值 <-->
    <CChartElement class="CChartEleRangeBar" Coord="axis_xy0" weight="0.1" x="0.1" by="-2" dy="1.5" color="0x13E4DE"/>
    <CChartElement class="CChartEleRangeBar" Coord="axis_xy0" weight="0.1" x="0.2" by="-2" dy="1.1" color="0xEF7D2F"/>
    <CChartElement class="CChartEleRangeBar" Coord="axis_xy0" weight="0.1" x="0.3" by="-2" dy="0.9" color="0x0068FF"/>
    <CChartElement class="CChartEleRangeBar" Coord="axis_xy0" weight="0.1" x="0.4" by="-2" dy="1.0" color="0xFF00D0"/>
    <CChartElement class="CChartEleRangeBar" Coord="axis_xy0" weight="0.1" x="0.5" by="-2" dy="2.7" color="0xEF7D2F"/>
    <CChartElement class="CChartEleRangeBar" Coord="axis_xy0" weight="0.1" x="0.6" by="-2" dy="0.6" color="0x13E4DE"/>
    </CChartSeries>
    </data>
    </Control>
  • 散点图例子
    <Control Class="CChartViewUI" name="chart0" Layout="300,fill" chart-padding="40,40,40,40" round-radius="rx:10;ry:10" back-show="always">
    <data>
    <!-->坐标轴X和Y。属性参考类文档<-->
    <CChartCoordinate class="LinearAxis" name="axis_x0" range="0,1" unit="0.1" minor-style="step:1" Precision="1" scope-increment="1"/>
    <CChartCoordinate class="LinearAxis" name="axis_y0" Vertical="true" Precision="1" range="-2,2" unit="0.1" minor-style="step:1" show-gridbk="false" zoom="false" />
    <!-->将坐标轴X和Y,组合成坐标系 。属性参考类文档<-->
    <CChartCoordinate class="CCoordinateAffine" name="axis_xy0" axisx="axis_x0" axisy="axis_y0"/>
    <!-->线条序列<-->
    <CChartSeries class="CChartSeriesContain" line-color="#2F7DEF">
    <CChartElement class="CChartEleScatter" Coord="axis_xy0" v1="0.1" v2="1.3874355565226746" r="0.1" mark-type="circle" color="hsv(36.0,100,100)"/>
    <CChartElement class="CChartEleScatter" Coord="axis_xy0" v1="0.2" v2="0.47014506715347415" r="0.1" mark-type="circle" color="hsv(72.0,100,100)"/>
    <CChartElement class="CChartEleScatter" Coord="axis_xy0" v1="0.30000000000000004" v2="-0.36454188003719157" r="0.1" mark-type="circle" color="hsv(108.00000000000001,100,100)"/>
    <CChartElement class="CChartEleScatter" Coord="axis_xy0" v1="0.4" v2="-0.3795491585854083" r="0.1" mark-type="circle" color="hsv(144.0,100,100)"/>
    <CChartElement class="CChartEleScatter" Coord="axis_xy0" v1="0.5" v2="0.23226344000224497" r="0.1" mark-type="circle" color="hsv(180.0,100,100)"/>
    <CChartElement class="CChartEleScatter" Coord="axis_xy0" v1="0.6" v2="-0.9954885752292142" r="0.1" mark-type="circle" color="hsv(216.0,100,100)"/>
    <CChartElement class="CChartEleScatter" Coord="axis_xy0" v1="0.7" v2="1.4333993966306915" r="0.1" mark-type="circle" color="hsv(251.99999999999997,100,100)"/>
    </CChartSeries>
    </data>
    </Control>
  • K线图例子
    <Control Class="CChartViewUI" name="chart0" Layout="300,fill" chart-padding="40,40,40,40" round-radius="rx:10;ry:10" back-show="always">
    <data>
    <!-->坐标轴X和Y。属性参考类文档<-->
    <CChartCoordinate class="LinearAxis" name="axis_x0" range="0,1" unit="0.1" minor-style="step:1" Precision="1" scope-increment="1"/>
    <CChartCoordinate class="LinearAxis" name="axis_y0" Vertical="true" Precision="1" range="-2,2" unit="0.1" minor-style="step:1" show-gridbk="false" zoom="false" />
    <!-->将坐标轴X和Y,组合成坐标系 。属性参考类文档<-->
    <CChartCoordinate class="CCoordinateAffine" name="axis_xy0" axisx="axis_x0" axisy="axis_y0"/>
    <!-->线条序列<-->
    <CChartSeries class="CChartSeriesContain" line-color="#2F7DEF">
    <CChartElement Class="CChartEleCandles" kstyle="kline" Coord="axis_xy0" weight="0.05" x="0.1" low="0.1" high="1.6" open="0.4" close="1.0"/>
    <CChartElement Class="CChartEleCandles" kstyle="kline" Coord="axis_xy0" weight="0.05" x="0.2" low="0.2" high="1.0" open="1.0" close="0.5"/>
    <CChartElement Class="CChartEleCandles" kstyle="kline" Coord="axis_xy0" weight="0.05" x="0.3" low="0.3" high="1.3" open="0.35" close="1.1"/>
    <CChartElement Class="CChartEleCandles" kstyle="kline" Coord="axis_xy0" weight="0.05" x="0.4" low="0.4" high="1.4" open="1.3" close="0.4"/>
    <CChartElement Class="CChartEleCandles" kstyle="kline" Coord="axis_xy0" weight="0.05" x="0.5" low="0.5" high="0.9" open="0.7" close="0.8"/>
    <CChartElement Class="CChartEleCandles" kstyle="kline" Coord="axis_xy0" weight="0.05" x="0.6" low="0.6" high="1.3" open="1.2" close="1.0"/>
    </CChartSeries>
    </data>
    </Control>
鄂公网安备42018502007752 鄂ICP备2024082886
Copyright © 2025 · CBlueStudio 版权所有